How to Use Drive Shipping and Network Based Data Import for Office 365
Overview of Office 365
Office 365 provides software and services subscription, which is used in various organisations. These services contain the usage of MS Office Apps on Windows as well as Mac OS along with storage space on MS Cloud, 60 Skype minutes for each month , etc.
Drive Shipping and Network Based Data Import for Office 365
There is no doubt that Microsoft goes at great heights to ensure the safety of user’s data stored on their cloud. However, many times users need to import their PST files to Office 365. To perform this, Microsoft provides an option of Drive shipping. In this, users can copy the PST data file to BitLocker encrypted hard drive in a way to provide security. Then, it can be physically shipped to Microsoft. When they receive the hard drive, the data center will personally upload that PST data to temporary stored location in MS cloud. After that, by utilising Office 365 import service user can import the data to their mailbox. In the following section, we will discuss the way to use drive shipping to import PST files to office 365.
Pre-Requisite
1. The user must have an account with FedEX or DHL
Note : Microsoft use this account to return hard drive to user
2. Hard drive on which, user copies the PST data must be encrypted via BitLocker.
3. Hard drive size should be 6 TB or less .
Note : TB is Terabyte
4. The retention period should be on for indefinite duration.
Note : Retention period is a duration for which emails in mailbox are stored based on retention settings configured
5. Mailbox Import Export role must be assigned to user performing the migration to office 365 .
How to use Drive Shipping Office 365 Method to Import PST Files :
There are some steps that user need to follow to utilise drive shipping and PST import service to migrate data to office 365 environment
Step 1: Download Import Tool
Firstly, user needs to download import tool and secure key of storage for copying the data to hard drive for this follow the mentioned steps.
1. Go to https://protection.office.com
2. Login to Office 365 by using the credentials for an administrator account .
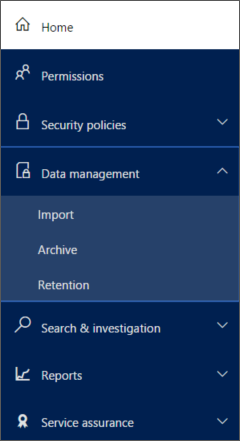
3. Choose the data management option from the left pane of security and compliance center and click Import .
4. Import page opens up then click “import” .
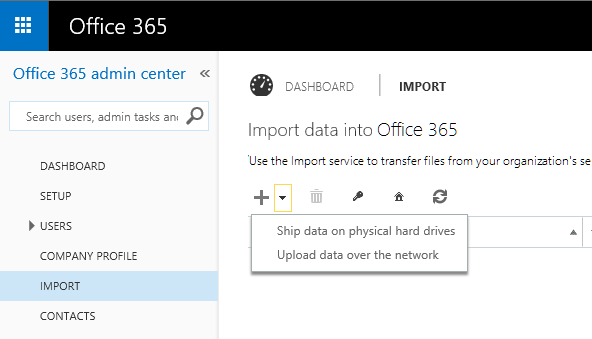
5. Select “new job +” option and select ship data on physical hard drives option .
6. New job page opens up , click on Download Tool option .
7. Click on option save > save As to save WAImportExport.zip file to folder on your local machine .
8. Extract WAImportExport.zip file and go back to page of ship files on physical drive and copy secure storage key.
9. Copy the displayed key in the box and store it to a file.
10. Close the page by clicking on cancel button .
Step 2: Copy PST file Data to Hard Drive
Use WAImportExport.exe tool to copy PST files to the hard drive PST files to hard drive .
1. Open cmd on your system.
2. Now, go to directory where WAImportExport.exe tool is installed in Step 1 .
3. Run the following command to copy PST files to hard drive .

Description :
/j: – specifies name of Journal file .
Syntax:
/j:<Name of Journal file>
Journal file : Users ship hard drive to Microsoft then information associated with drive is stored in Journal file .
/t: – specifies the drive letter of hard drive connected to local machine .
Syntax
/t:<drive letter>
/id: – specifies name of copy session . PST files are copied to folder with name specified by /id: parameter .
Syntax :
/id:<Name of session>
/srcdir: – specifies source directory that contains PST files that will be copied to hard drive .
Syntax :
/srcdir: <location of PST files >
/dstdir: specifies destination directory in Microsoft cloud where PST files are uploaded .
/dstdir: – <storage path of PST file>
/sk: – specifies secure storage account key obtained in step 1 .
Syntax:
/sk:< Secure storage account key>
/logdir: – Optional feature that specifies location of log file .
Syntax :
/logdir:<Log File storage Location>
/encrypt: – copy BitLocker encryption key to Journal or log file .
4. Run the mentioned command each time, when it is required to run the WAImportExport.exe tool for copying same PST files to same hard drive.

Step 3 – Create PST Import Mapping/CSV File
Microsoft data center uploads PST file from hard drive to Azure data storage area, import service will utilise the information in importing the mapping file, which is CSV file. It specifies which user mailbox PST file will be imported.
1. Download CSV file .
2. Open and store CSV file on your system.
3. CSV file must have parameters as follows :
|
Parameter |
Description |
Value |
|
Workload |
Specifies the Office 365 service that data will be imported to . |
Exchange |
|
FilePath |
Specifies the folder location in Microsoft cloud azure where PST files will be copied to when hard drive shipped to Microsoft . |
Blank or FILESERVER00/PST |
|
Name |
Specifies the name of PST file that is to be migrated to the user mailbox . |
sb.pst |
|
Mailbox |
Specifies the email address of the mailbox that the PST file will be imported to. Here user is migrating to office 365 environment . |
admin11@365infom.com |
|
IsArchive |
Specifies whether or not PST file is imported to archive mailbox . False: Import PST file to user mailbox . True: Import PST file to archive mailbox . |
False or True |
|
TargetRootFolder |
Specifies mailbox folder where PST files are moved to . |
/Inbox |
Step 4. Create PST Import Job
Create PST import job in the Import service in Office 365. Import service will utilize information of mapping file .
1. Go to https://protection.office.com
1. Again login and choose import from left menu .
2. Go to import services and click on “new job +” option and click on ship data on physical hard drives.
3. On New job page, check check boxes “I’ve prepared my hard drives and have access to the necessary drive journal files” and “I have access to the mapping file” check boxes, and then click Next .
4. Type name for PST Import job, and click Next .
5. Click on Add+ option and go to same folder where WAImportExport.exe tool is located on Upload the drive files page .
6. Choose the journal file and click Next .
7. Click on Add+ option and choose CSV created in step 3.
8. Once the CSV is uploaded then click Next.
9.Choose contacts from left menu , contact information page opens up . Type contact information click Next then Finish.
Note : Address of Microsoft is generated automatically depending on office 365 data center location selected .
Now refresh Import data to Office 365 page to display new shipping import job list.
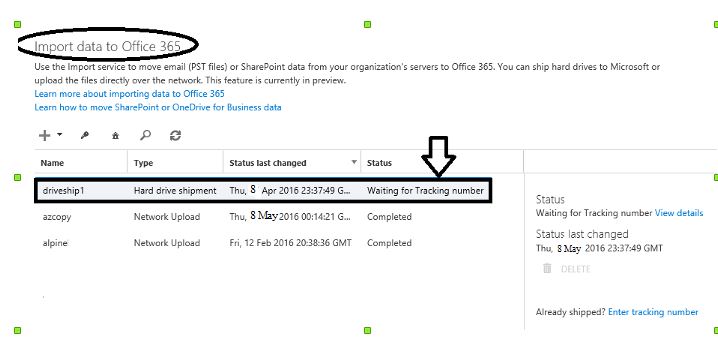
Step 4 : Ship Hard Drive
The final step is to ship the hard drive to Microsoft and then the tracking number is provided and returns shipment information for drive shipping job. Once the drive is received by Microsoft, it will be uploaded by data center to storage area.
Disadvantages Drive Shipping and Network Based Data Import for Office 365 :
1. Cost of importing PST files to Office 365 environment using drive shipping method is high that is $2 USD per GB of data . cost of importing depends on data .
2. Lengthy method
3. Time consuming .
4. Difficult to understand for a non technical person .
5. High storage capacity hard drive is required .
Conclusion
Office 365 has set a benchmark for the IT services for small as well as large business environments by transferring the Office on cloud. It provides various facilities for users in importing the data to Office 365. In the above discussion manual method of Drive Shipping and Network Based Data Import for Office 365 has drawbacks . I would recommend users to use Outlook to Office 365 Migration tool . Software offers features such as :
1. Support bulk migration of PST Files
2. Transfer Emails , attachments , contacts and other mail items from Outlook to Office 365 environment .
3. Import Selected data from Outlook to office 365 environment .
4. Demo version is available for users to free download .
5. Transfer PST file without any file size limit for migration .